To reduce the chance of damage and for ease of handling, Rock Solid linen towers are shipped in sections. A medium Phillips (+) screw driver, carpenters glue and paper towel or a clean rag are required to assemble the linen tower. Dowels and screws are provided.
NOTE: Assemble the linen tower in the room where it will be installed. We recommend having a skilled trades professional complete the installation.
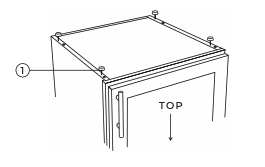
(1) REMOVE NAIL GLIDE FEET FROM UPPER UNIT
Place the upper unit upside down with the top on the floor and remove/discard the four nail glide feet.
(2) ADD GLUE TO UPPER UNIT
Place a few drops of glue in the four dowel holes of the upper unit.
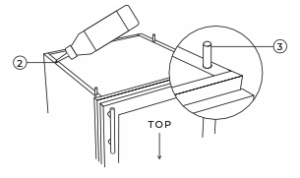
(3) ADD DOWELS TO UPPER UNIT
Push the four dowels into the holes on the upper unit. Gently tap the dowels into place until they can go no further.
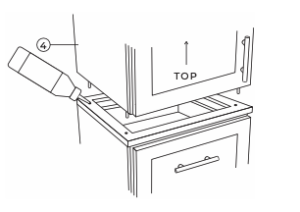
(4) PLACE UPPER UNIT ON LOWER UNIT
Place a few drops of glue in the four dowel holes of the lower unit and place the upper unit on top of the lower unit, aligning the dowels and holes. Wipe off any excess glue.
(5) ADD FILLER STRIPS (IF APPLICABLE)
If the linen tower is being installed against a wall, two filler strips are provided. Install the shorter 33″ piece at the bottom section of the linen tower for a less noticeable seam.
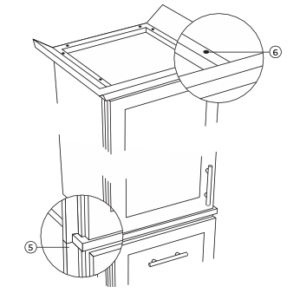
(6) INSTALL CROWN MOLDING (IF APPLICABLE)
Align the pre-drilled holes in the crown molding to the top of the cabinet and secure using screws provided. If the linen tower is being installed next to a wall, cut back the crown molding before affixing to the linen tower.
Note: This cut must be performed on site by a skilled trades professional.
IMPORTANT:
Once assembly is complete, the linen tower must be secured to the wall. Screw through the installation strip at the top interior of the tower directly into a stud. If a stud cannot be found, use a wall anchor.

